Loose Implant Abutment Screw
An implant-crown restoration that demonstrates mobility.
Presentation
Population
- Individuals with any crown restoration cemented on an implant abutment
- Greater prevalence among individuals with a bruxism and/or clenching habit
Signs
- Loose implant-supported crown
- Crown may be a cemented restoration over a prosthetic implant abutment
- Mobility of the crown/bridge abutment with or without gingival inflammation
- Possible redness or swelling of the surrounding tissues
Symptoms
- Pain severity: there may or may not be any pain or discomfort around the crown; usually minimal or moderate pain.
- Manipulation of crown may illicit some rotational and possibly slight vertical movement.
- The bite may feel different or high on the implant restoration.
- A bad odour or taste may be associated with the implant crown.
Investigation
- Confirm that there is no failure of the cement seal.
- Identify the type of implant using radiographic examination. Check record of restoration, or contact the dentist who placed the restoration and surgeon to confirm the fixture type.
- Palpate the crown restoration to reveal lateral mobility.
- Movement ranges from very minimal to 1–2 mm with “hard stop” (clicking of metal on metal); a loose fixture would tend to have “soft stop.”
- Any pivotal movement that appears to be located well below the base of the prosthetic abutment may indicate fracture or failure of the implant. If so, expect discomfort on movement.
- Assess whether or not the crown is vertically mobile, especially during early stages of abutment screw loosening. There is a limit to how high the crown can be raised.
- Be careful with a loose crown/abutment assembly that has rotational but no lateral/vertical movement. The abutment and screw may be a single structure without a separate internal screw (i.e., a “solid post”). Therefore, no occlusal access will be possible for the abutment screw and caution should be used when removing the crown.
- Radiographic examination may:
- Indicate good boney support for the implant. The entire body of the implant fixture should be intact, eliminating the possibility of an implant fracture.
- Reveal a microgap between the abutment and the occlusal platform of the implant (Fig. 1).
- Reveal a fracture of the abutment screw within the body of the implant still present as a loose crown.
- There is a higher prevalence of screw loosening in patients with a history of bruxism and/or clenching.
 Figure 1: Radiograph reveals a microgap between the abutment and the occlusal platform of the implant. Also note that the crown is not fully seated on the abutment.
Diagnosis
Based on the clinical examination and radiographic evidence, a diagnosis of loose implant abutment screw is determined.
Differential Diagnosis
- Failed cement seal
- Fractured implant
- Failed implant
- Fractured prosthetic abutment
Treatment
Common Initial Treatments
- Advise patient of the possible sequelae of trying to remove the abutment/crown assembly.
- In the worst case scenario, remake of the restoration may be required if it is not possible to remove the unit intact.
- If the porcelain fractures beyond the simple entry hole, it might be prudent to have a temporary restoration ready in case the crown cannot be replaced.
- Attempt to obtain the original lab master cast for the crown.
- Placing a guide pin into the implant analogue will indicate the inclination and angulation of the abutment screw.
- Transfer this information onto the clinical crown to indicate the location of the abutment access hole.
- Alternatively, fabricate a vacuum-formed stent over the master model.
- The area of the crown can be blocked out so the stent will fit over the loose crown.
- Placing a hole in the stent in the direction of the guide pin will make it easier to start the drilling process through the crown.
- Carefully drill through the porcelain crown with a diamond bur and copious irrigation.
- Caution should be used when cutting near zirconia abutments. There may be some difficulty delineating between the abutment and the ceramic crown.
- Once the access hole is located, carefully bore out the edges of the crown to expose the filling material (cotton pellets, polytetrafluoroethylene [PTFE] tape, gutta-percha). Remove the filling material and confirm that there is a clear view to the abutment screw (Fig. 2).
- Confirm the type of abutment screw and matching driver tip.
- There must NOT be any margin impingement from the sides of the crown as the abutment screw driver is placed (Fig. 3).
- Anything that does not allow full engagement of the screw driver could lead to damage or stripping of the abutment screw.
- Carefully inspect and clean the inside of the implant, abutment screw, and crown.
- Confirm that the screw is not damaged or worn.
- If the screw is not good for reinsertion, replace it with a new screw if necessary.
- Applying the proper torque to the abutment screw is important.
- The alternative is to fabricate a new restoration.
- Verify the fit of the crown/abutment with a radiograph prior to sealing the access hole.
- Confirm that light occlusal contacts are centrally located on the crown, and eliminate any significant excursive interference.
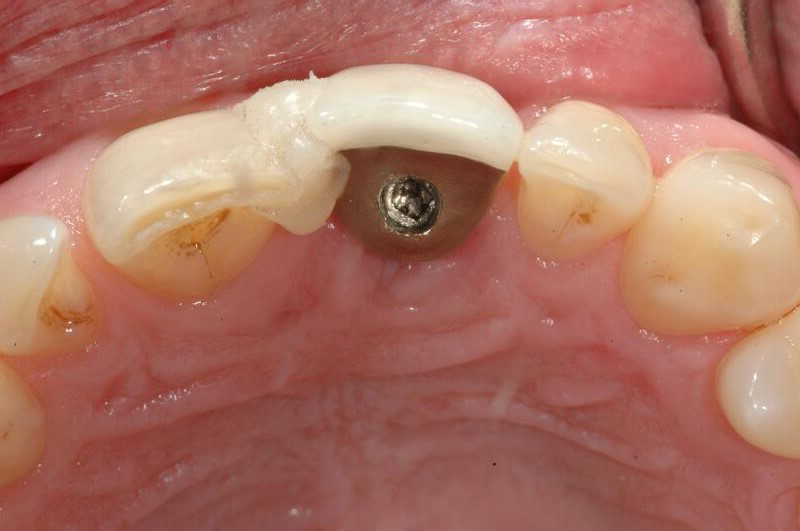 Figure 2: Clear view to the abutment screw after filling material is removed.
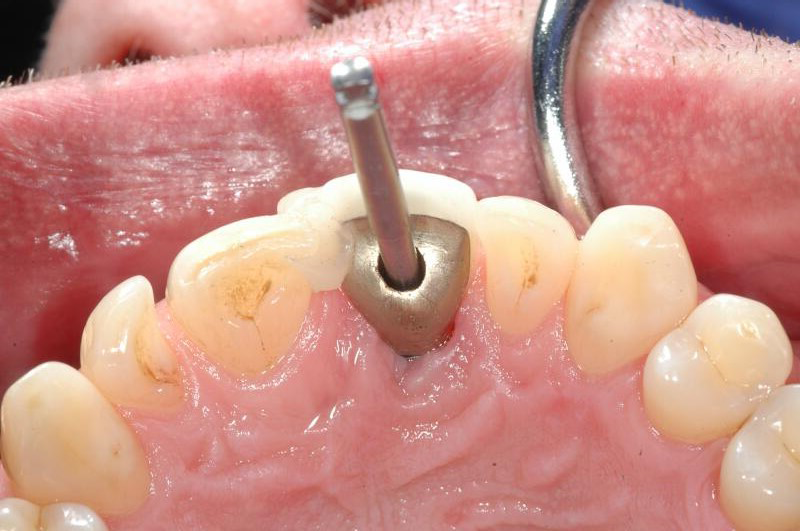 Figure 3: Ensure there is no margin impingement from the sides of the crown as the abutment screw driver is placed.
If No Master Cast is Available
- Confirm the orientation of the implant with a radiograph.
- The buccal-lingual orientation may be estimated from palpation of the surrounding soft tissues. For instance, a significant buccal depression may indicate that the implant fixture is positioned to the lingual.
- Continue with steps 4–10 listed previously.
- The objective of treatment should be to stabilize/replace the loose crown; locating the abutment screw with minimal trauma to the restoration and implant components is imperative.
- If the access hole to the abutment screw is direct and clean, the same crown may be used as a functional restoration.
- After tightening the abutment screw, the access hole must be filled with a soft material (cotton pellets, PTFE tape, gutta-percha) and then composite resin.
- The continued use of the crown is occasionally possible for bicuspids and molars. Usually, an anterior crown will need to be remade if the screw access is through the labial surface.
Advice
- A loose abutment screw should be treated urgently, otherwise further damage or fracture of the implant components could occur.
- A cemented crown onto an implant abutment takes on the path of insertion of the implant and not the abutment. As such, it may not always be possible to remove the implant crown/abutment assembly due to binding of the contact areas during attempted removal. In this case, straight tightening is best and is often the only course of action if a new crown is not contemplated.
THE AUTHOR
 |
Dr. Hum is a prosthodontist who maintains a private practice in Ottawa. |
Correspondence to: Dr. Stewart Hum, Prosthodontics on Chamberlain, 30 Chamberlain Avenue, Ottawa ON K1S 1V9. Email: drshum@rogers.com
The author has no declared financial interests.
This article has been peer reviewed.
Suggested Resources
- Patil PG. A technique for repairing a loosening abutment screw for a cement-retained implant prosthesis. J Prosthodont. 2011;20(8):652-5.
- Schwedhelm ER, Raigrodski AJ. A technique for locating implant abutment screws of posterior cement-retained metal ceramic restorations with ceramic occlusal surfaces. J Prosthet Dent. 2006;95(2):165-7.